
Goal: production‑ready, lightweight analytics in Astro. We’ll wire a modal (open/submit/success/error) to dataLayer, forward calls through Partytown, and configure GTM with Data Layer Variables (DLVs) so your marketers get clean, reliable data.
Performance first: GTM loads off the main thread with Partytown. Your UI stays snappy while events still flow.
Architecture at a glance
- Emit custom events in your Astro components → push to
dataLayer. - Forward
dataLayer.pushvia Partytown so GTM runs in a web worker. - Capture events in GTM → create DLVs (e.g.,
popup_name,popup_source). - Route to tags (GA4 / Ads / etc.) with robust triggers and naming.
- Validate in GTM Preview, then ship.
We’ll implement a simple request modal and track 4 events:
popup_openpopup_form_submitpopup_form_successpopup_form_error
1) Install & configure Partytown
In Astro, add the integration:
npx astro add partytownThen forward the GTM call (in Astro config file):
// astro.config.mjs / astro.config.ts
import { defineConfig } from 'astro/config'
import partytown from '@astrojs/partytown'

export default defineConfig({
  integrations: [
    partytown({
      config: {
        forward: ['dataLayer.push'],
      },
    }),
  ],
})
Add the GTM loader to your layout as a Partytown script:
<script type="text/partytown">
    ;(function (w, d, s, l, i) {
    w[l] = w[l] || []
    w[l].push({ 'gtm.start': new Date().getTime(), event: 'gtm.js' })
    var f = d.getElementsByTagName(s)[0],
        j = d.createElement(s),
        dl = l != 'dataLayer' ? '&l=' + l : ''
    j.async = true
    j.src = 'https://www.googletagmanager.com/gtm.js?id=' + i + dl
    f.parentNode.insertBefore(j, f)
    })(window, document, 'script', 'dataLayer', 'your-GTM-code')
</script>
Place this
<script type="text/partytown">in<head>after Partytown is initialized by the Astro integration. The classic<noscript>iframe fallback is typically omitted when GTM runs via Partytown.
Use the standard GTM snippet but switch type="text/partytown". Keep your real container ID in place of your-GTM-code.
2) Modal markup & script (Astro component)
Create an Astro component for the modal.
<aside class="requestModal" role="dialog" aria-modal="true" aria-labelledby="requestModalTitle" >
   <div class="content" tabindex="-1">
      <h2 id="requestModalTitle">We'll get back to you</h2>
      <form id="requestForm" novalidate>
         <div class="formGroup">
            <label for="name">First name <span aria-hidden="true">*</span></label> <input type="text" name="name" id="name" placeholder="First name" autocomplete="given-name" />
            <p class="error" id="error-name" role="alert"></p>
         </div>
         <div class="formGroup">
            <label for="company">Company name & city <span aria-hidden="true">*</span></label> <input type="text" name="company" id="company" placeholder="Company name and city" autocomplete="organization" />
            <p class="error" id="error-company" role="alert"></p>
         </div>
         <div class="formGroup">
            <label for="phone">Phone number <span aria-hidden="true">*</span></label> <input type="tel" name="phone" id="phone" placeholder="+48 512 800 332" autocomplete="tel" inputmode="tel" />
            <p class="error" id="error-phone" role="alert"></p>
         </div>
         <div class="formGroup">
            <label for="email">Email address <span aria-hidden="true">*</span></label> <input type="email" name="email" id="email" placeholder="e.g. john.doe@company.com" autocomplete="email" />
            <p class="error" id="error-email" role="alert"></p>
         </div>
         <button class="button" type="submit" id="submitBtn">Send</button>
      </form>
   </div>
</aside>
Attach the interaction logic (open, validate, submit, thank-you) and push events to the dataLayer.
<script type="module">
const modal = document.querySelector('.requestModal')
const content = modal.querySelector('.content')
const form = document.getElementById('requestForm')
const submitBtn = document.getElementById('submitBtn')
let popupSource = 'unknown'
const POPUP_NAME = 'request'
window.dataLayer = window.dataLayer || []
document.addEventListener('click', (e) => {
const trigger = e.target.closest('[data-open-request]')
if (!trigger) return
const source = trigger.getAttribute('data-source') || 'unknown'
document.dispatchEvent(
new CustomEvent('open-request-modal', {
detail: { source },
}),
)
})
document.addEventListener('open-request-modal', (e) => {
popupSource = e?.detail?.source || 'unknown'
modal.classList.add('active')
setTimeout(() => {
const nameInput = document.getElementById('name')
nameInput?.focus()
nameInput?.select?.()
}, 0)
window.dataLayer.push({
event: 'popup_open',
popup_name: POPUP_NAME,
popup_source: popupSource,
})
})
modal.addEventListener('click', (event) => {
if (event.target === event.currentTarget) closeModal()
})
document.addEventListener('keydown', (e) => {
if (e.key === 'Escape' && modal.classList.contains('active')) closeModal()
})
function closeModal() {
modal.classList.remove('active')
}
const emailRE = /^[^\s@]+@[^\s@]+\.[^\s@]+$/
const phoneRE = /^\+?[0-9()\s-]{6,}$/
function validateEmail(value) {
return emailRE.test(String(value).toLowerCase())
}
function validatePhone(value) {
const v = value.trim()
if (!phoneRE.test(v)) return false
const digits = v.replace(/\D/g, '')
return digits.length >= 9
}
function setError(id, message) {
const p = document.getElementById('error-' + id)
const input = document.getElementById(id)
if (message) {
p.textContent = message
input.classList.add('invalid')
} else {
p.textContent = ''
input.classList.remove('invalid')
}
}
function validateForm() {
const name = document.getElementById('name').value.trim()
const company = document.getElementById('company').value.trim()
const phone = document.getElementById('phone').value.trim()
const email = document.getElementById('email').value.trim()
let valid = true
if (!name) {
setError('name', 'Please enter your first name.')
valid = false
} else {
setError('name')
}
if (!company) {
setError('company', 'Please enter your company name and city.')
valid = false
} else {
setError('company')
}
if (!phone) {
setError('phone', 'Please provide a phone number.')
valid = false
} else if (!validatePhone(phone)) {
setError('phone', 'That phone number looks invalid.')
valid = false
} else {
setError('phone')
}
if (!email) {
setError('email', 'Please provide an email address.')
valid = false
} else if (!validateEmail(email)) {
setError('email', 'That email address looks invalid.')
valid = false
} else {
setError('email')
}
return { valid, values: { name, company, phone, email } }
}
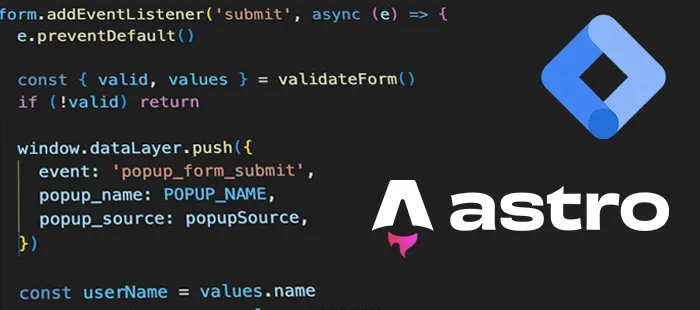
form.addEventListener('submit', async (e) => {
e.preventDefault()
const { valid, values } = validateForm()
if (!valid) return
window.dataLayer.push({
event: 'popup_form_submit',
popup_name: POPUP_NAME,
popup_source: popupSource,
})
const userName = values.name
const userCompany = values.company
const userPhone = values.phone
const userEmail = values.email
submitBtn.disabled = true
submitBtn.textContent = 'Sending...'
try {
const res = await fetch('/api/mail.php', {
method: 'POST',
headers: { 'Content-Type': 'application/json' },
body: JSON.stringify({
name: userName,
company: userCompany,
phone: userPhone,
email: userEmail,
submittedAt: new Date().toISOString(),
source: popupSource,
}),
})
if (!res.ok) throw new Error('An error occurred while sending the form')
window.dataLayer.push({
event: 'popup_form_success',
popup_name: POPUP_NAME,
popup_source: popupSource,
})
content.innerHTML = `
<div class="thankyou" tabindex="-1" aria-live="polite">
<h2>Thanks for reaching out! 🤝</h2>
<p>We'll call <strong>${escapeHtml(userPhone)}</strong> and email <strong>${escapeHtml(userEmail)}</strong> as soon as possible.</p>
<button class="button" id="closeThankYou">Close</button>
</div>
`
document.getElementById('closeThankYou')?.addEventListener('click', closeModal)
content.querySelector('.thankyou')?.focus()
} catch (err) {
window.dataLayer.push({
event: 'popup_form_error',
popup_name: POPUP_NAME,
popup_source: popupSource,
error_message: String((err && err.message) || 'unknown_error'),
})
alert('Could not send the form. Please try again in a moment.')
submitBtn.disabled = false
submitBtn.textContent = 'Send'
}
})
function escapeHtml(str) {
return str.replace(
/[&<>"']/g,
(m) =>
({
'&': '&',
'<': '<',
'>': '>',
'"': '"',
"'": ''',
})[m],
)
}
</script>Add the CSS (same file or global):
<style>
  .requestModal {
    position: fixed;
    inset: 0;
    display: none;
    place-content: center;
    background: rgba(5, 10, 25, 0.45);
    backdrop-filter: blur(2px);
    z-index: 1000;
    padding: 2rem;
  }
  .requestModal.active {
    display: grid;
    animation: fadeIn 180ms ease-out both;
  }
  @keyframes fadeIn {
    from {
      opacity: 0;
    }
    to {
      opacity: 1;
    }
  }

  .content {
    width: min(720px, 100%);
    background: #fff;
    color: #111827;
    border-radius: 14px;
    box-shadow: 0 10px 30px rgba(0, 0, 0, 0.18);
    padding: 28px;
    outline: none;
    animation: pop 160ms ease-out both;
  }
  @keyframes pop {
    from {
      transform: translateY(6px);
      opacity: 0.96;
    }
    to {
      transform: translateY(0);
      opacity: 1;
    }
  }
  .content:focus {
    box-shadow: 0 0 0 3px rgba(99, 102, 241, 0.35);
  }
  .content h2 {
    margin: 0 0 16px 0;
    line-height: 1.2;
    font-size: clamp(20px, 2.4vw, 28px);
    font-weight: 700;
    color: #0f172a;
  }

  form {
    display: grid;
    gap: 16px;
  }
  .formGroup {
    display: grid;
    gap: 6px;
  }
  label {
    font-weight: 600;
    font-size: 14px;
    color: #334155;
  }

  input[type='text'],
  input[type='email'],
  input[type='tel'] {
    width: 100%;
    height: 44px;
    border: 1px solid #e5e7eb;
    border-radius: 10px;
    padding: 0 14px;
    font-size: 16px;
    transition:
      border-color 0.15s ease,
      box-shadow 0.15s ease;
  }
  input::placeholder {
    color: #9ca3af;
  }
  input:focus {
    outline: none;
    border-color: #6366f1;
    box-shadow: 0 0 0 3px rgba(99, 102, 241, 0.2);
  }

  input:focus-visible,
  .button:focus-visible,
  .content:focus-visible {
    outline: none;
    box-shadow: 0 0 0 3px rgba(99, 102, 241, 0.35);
  }

  input.invalid {
    border-color: #ef4444;
    box-shadow: 0 0 0 3px rgba(239, 68, 68, 0.15);
  }

  .error {
    min-height: 18px;
    font-size: 13px;
    color: #b91c1c;
    margin: 2px 2px 0;
  }

  .button {
    display: inline-flex;
    align-items: center;
    justify-content: center;
    height: 44px;
    padding: 0 18px;
    border: 0;
    border-radius: 10px;
    background: #111827;
    color: #fff;
    font-weight: 700;
    font-size: 15px;
    cursor: pointer;
    transition:
      transform 0.05s ease,
      opacity 0.15s ease,
      box-shadow 0.15s ease;
  }
  .button:hover {
    opacity: 0.95;
  }
  .button:active {
    transform: translateY(1px);
  }
  .button:disabled {
    opacity: 0.6;
    cursor: not-allowed;
  }

  @media only screen and (max-width: 768px) {
    .requestModal {
      padding: 1rem;
    }
    .content {
      padding: 3rem;
      width: 90vw;
      border-radius: 12px;
    }
    .button {
      width: 100%;
    }
  }
</style>
<style is:global>
  .thankyou {
    text-align: center;
    padding: 24px 6px;

    display: flex;
    flex-direction: column;
    align-items: center;
  }

  .thankyou .button {
    margin-top: 2rem;
  }

  .thankyou h2 {
    margin-bottom: 8px;
  }
</style>
Add a trigger button somewhere in your UI:
<button class="button" data-open-request data-source="nav">Get Offer</button>Why these events?
They reflect a typical funnel: open → submit → result. Each includes popup_name and popup_source, so GTM can slice traffic by context (where the popup was opened: nav, hero, footer, etc.).
3) Event schema & naming
Keep your dataLayer payloads small and consistent:
{
  "event": "popup_form_success",
  "popup_name": "request",
  "popup_source": "nav"
}
Recommended fields:
event(string): machine‑friendly name (snake_case).popup_name(string): which modal (e.g.,"request").popup_source(string): where the user came from (e.g.,"nav","hero").error_message(string, optional): only for failures.
Tip: Avoid nesting for DLVs; flat keys make GTM mapping trivial.
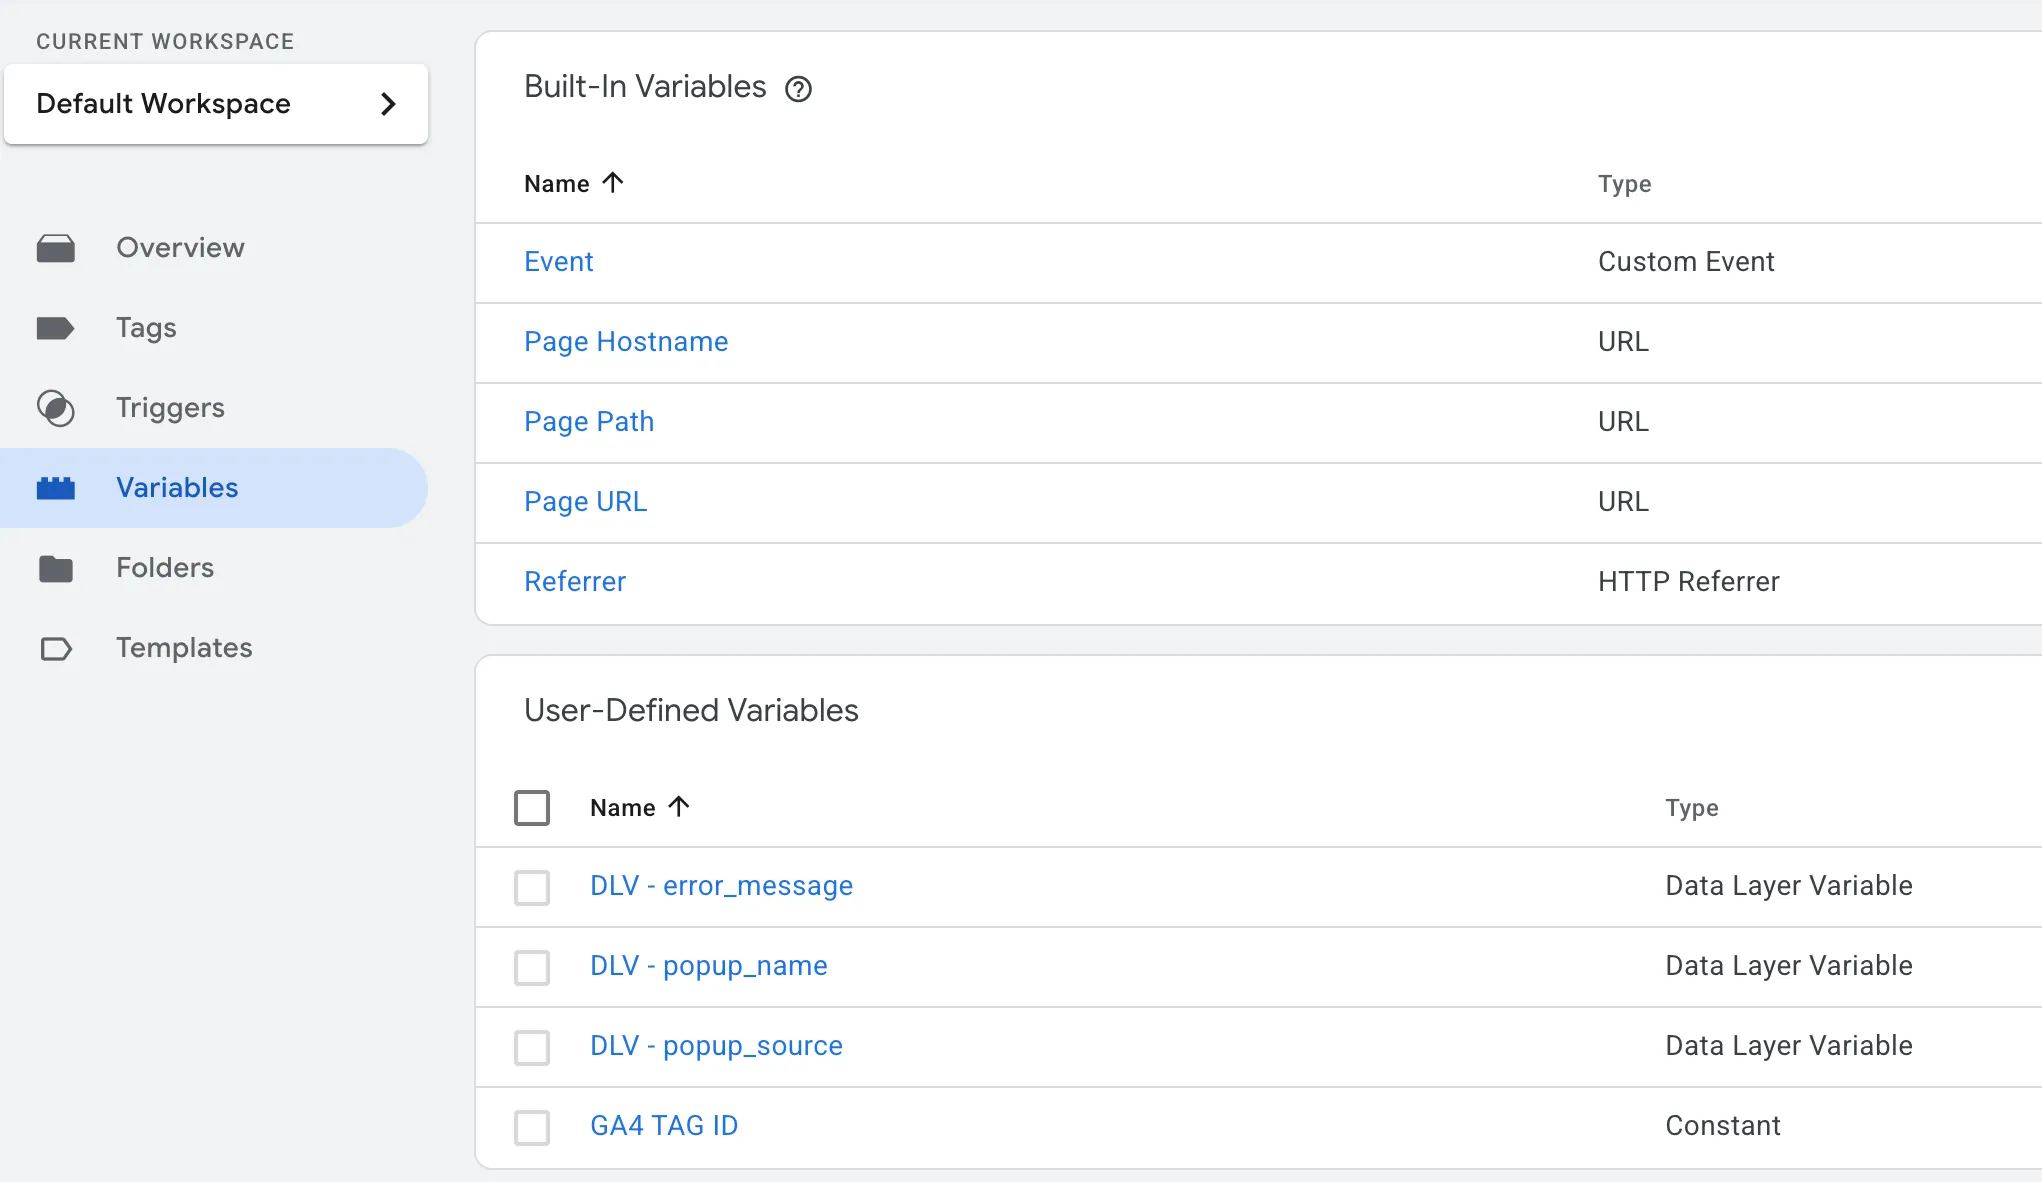
4) Configure GTM: Data Layer Variables (DLVs)
Open your GTM container and create the following Variables:
DLV - popup_name→ Name:popup_nameDLV - popup_source→ Name:popup_sourceDLV - error_message→ Name:error_message(optional)
Set all to Version: Version 2 (default). Leave “Data Layer Version” alone if not visible.
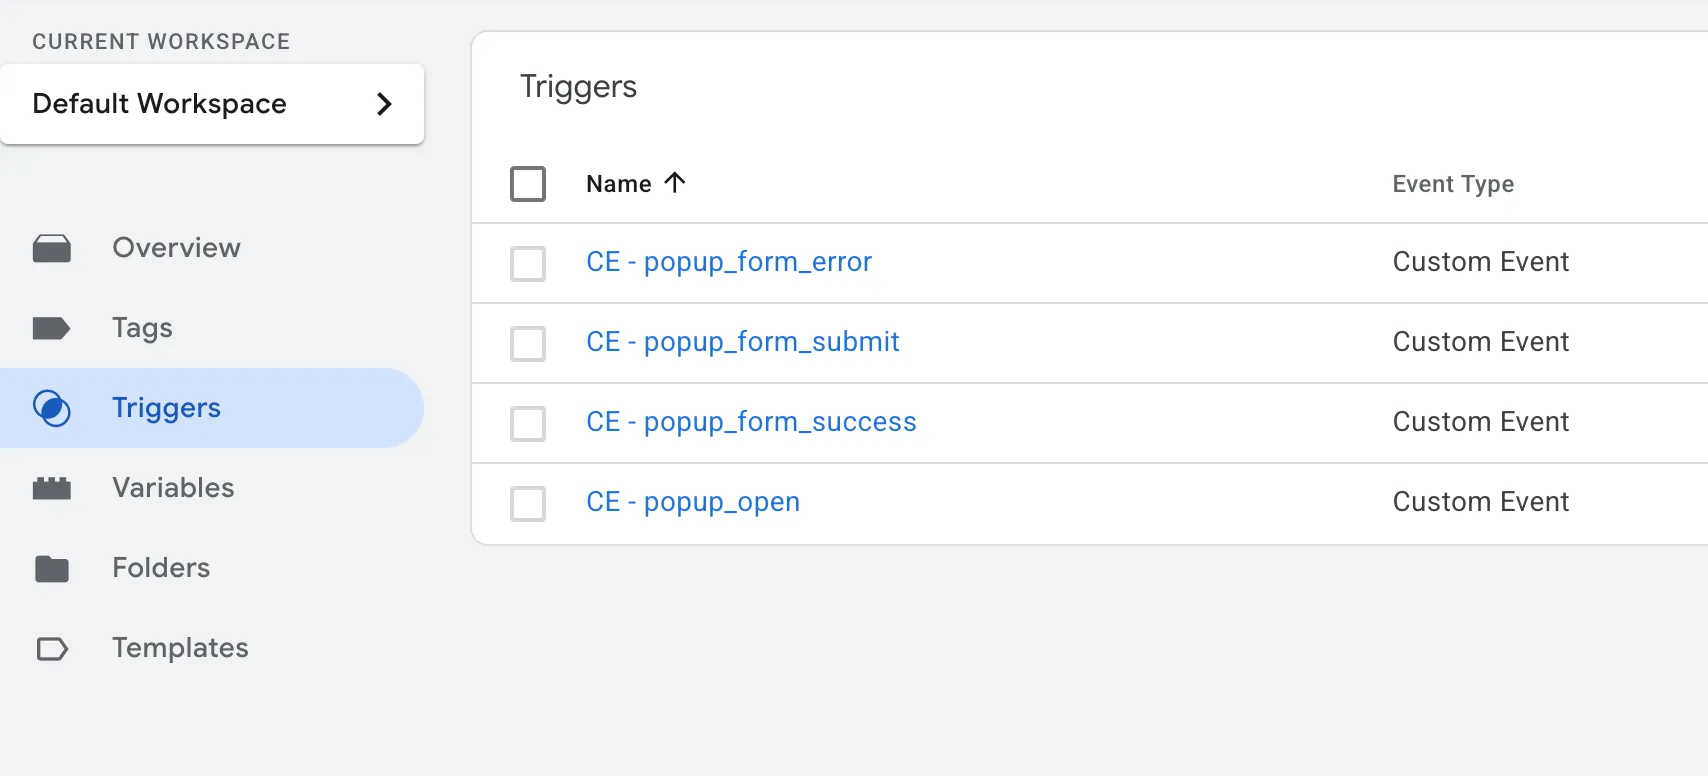
5) Triggers for each event
Create Custom Event triggers:
-
Trigger:
CE - popup_open
Type: Custom Event → Event name:popup_open -
Trigger:
CE - popup_form_submit
Type: Custom Event → Event name:popup_form_submit -
Trigger:
CE - popup_form_success
Type: Custom Event → Event name:popup_form_success -
Trigger:
CE - popup_form_error
Type: Custom Event → Event name:popup_form_error
Optionally add conditions like “Page URL contains
/pricing” if you only want specific pages.
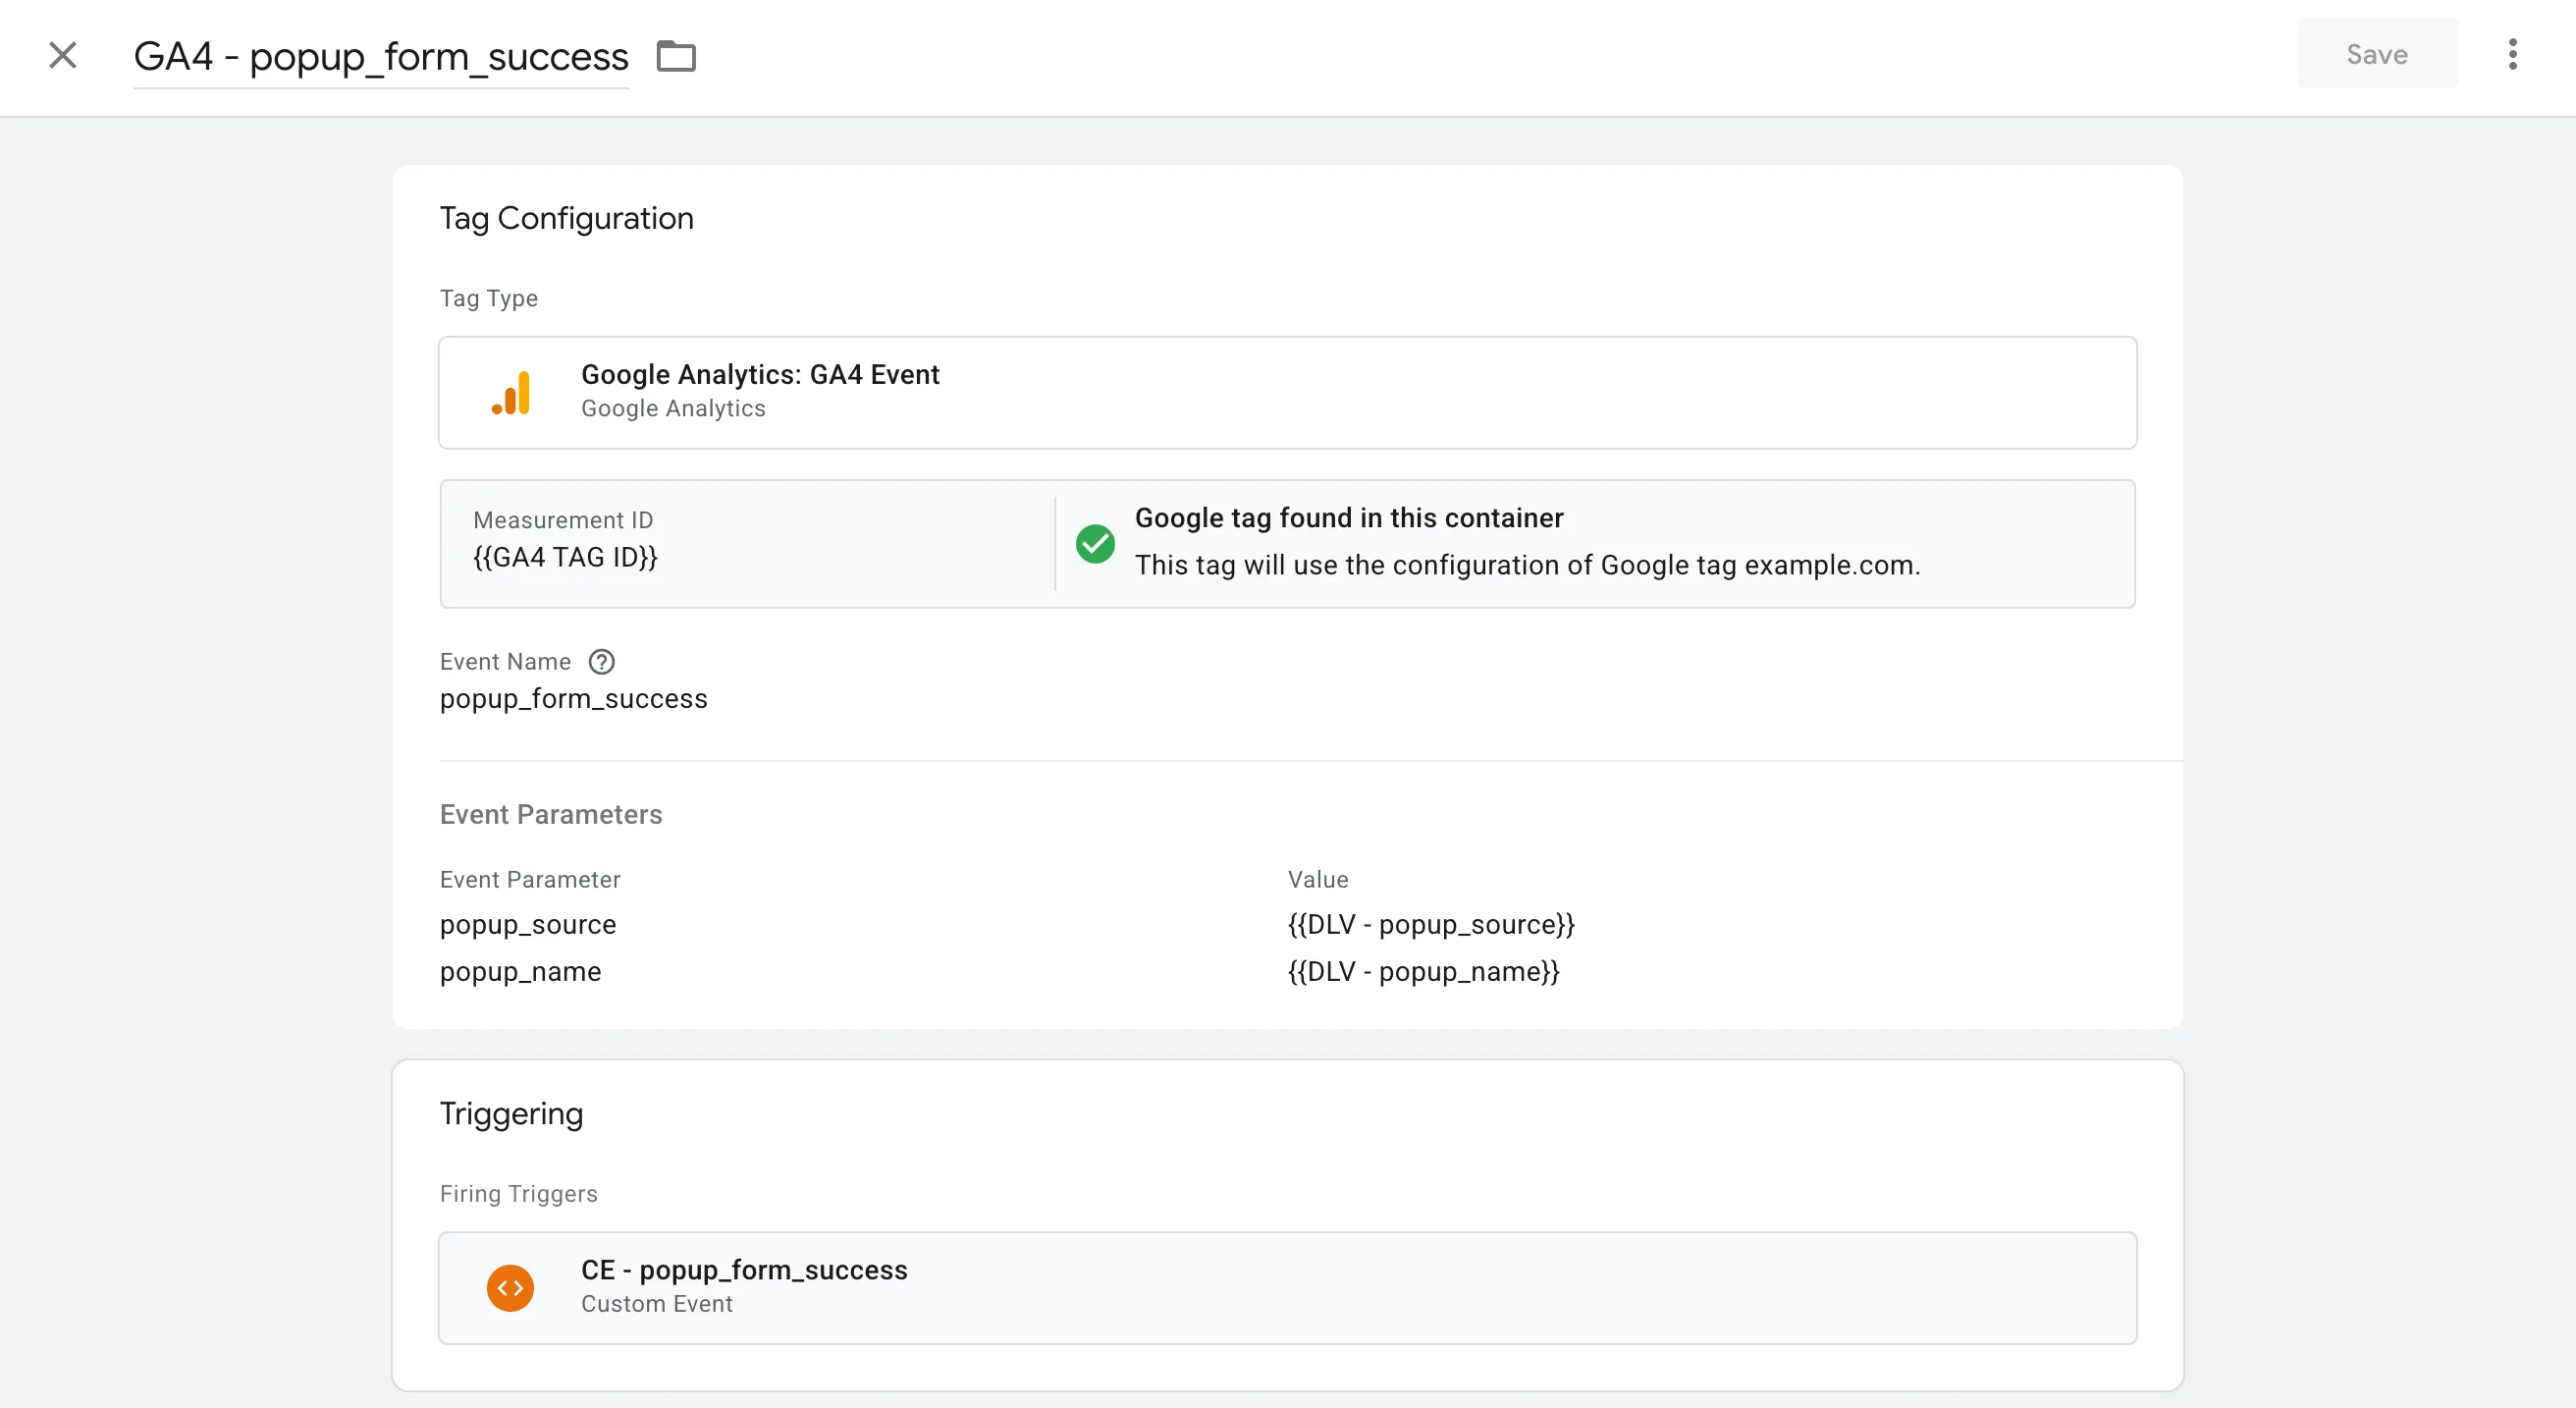
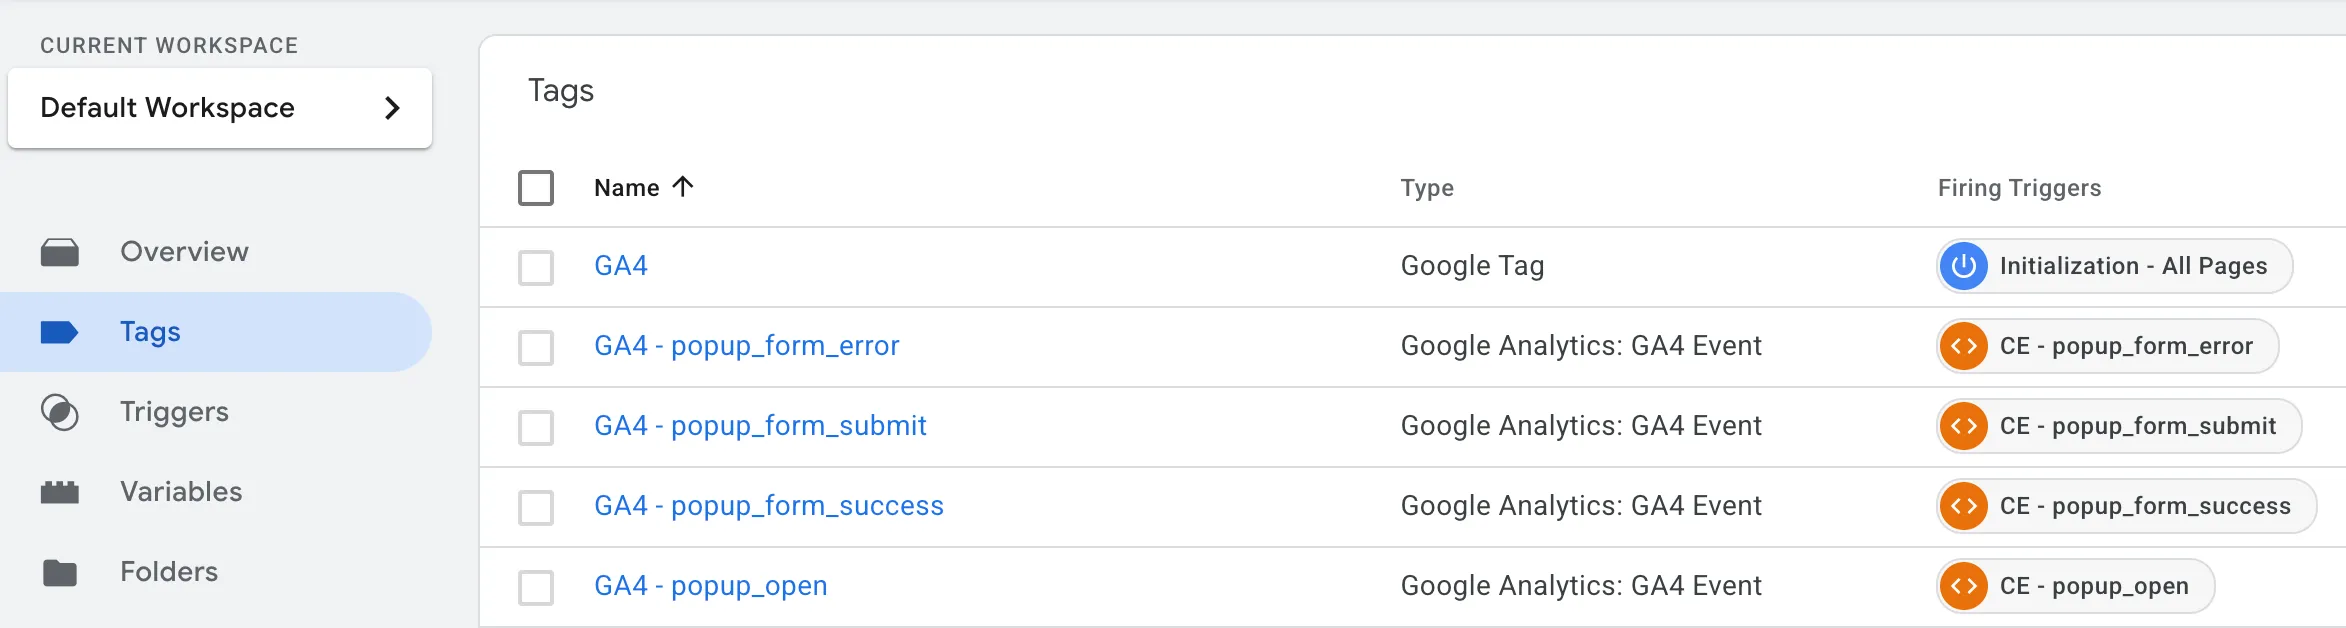
6) Tags (GA4 example)
If you use GA4, create Event tags:
-
Tag:
GA4 - popup_open
Type: Google Analytics: GA4 Event
Configuration Tag: your GA4 config
Event Name:popup_open
Event Parameters:popup_name→{{DLV - popup_name}}popup_source→{{DLV - popup_source}}
-
Tag:
GA4 - popup_form_submit→ same params as above -
Tag:
GA4 - popup_form_success→ same params -
Tag:
GA4 - popup_form_error→ add paramerror_message→{{DLV - error_message}}
Each tag should use the corresponding EV trigger.
Using other platforms (Ads, Mixpanel, custom endpoint)? Reuse the same triggers and variables; only the tag type changes.
7) Test in GTM Preview (temporarily without Partytown)
Heads-up: GTM Preview doesn’t work when GTM is loaded via Partytown (running in a Web Worker). To preview and debug:
-
Temporarily disable Partytown for GTM
- In your layout, change the GTM loader from
to the standard, main-thread snippet:<script type="text/partytown">/* GTM bootstrap */</script><script>/* GTM bootstrap */</script> - In your Partytown config, temporarily remove/disable forwarding:
// partytown({ config: { forward: [] } }) - Rebuild/restart your dev server.
- In your layout, change the GTM loader from
-
Open GTM → Preview and load your site.
-
Click Get Offer → modal opens.
- You should see
popup_openin the Events panel. - Verify variables:
popup_name = request,popup_source = nav.
- You should see
-
Submit the form with valid data:
popup_form_submitappears immediately.- On success,
popup_form_success. - On failure,
popup_form_error(witherror_message).
-
In Tags, confirm the correct tag fired for each event.
-
Re-enable Partytown
- Switch back to:
<script type="text/partytown">/* GTM bootstrap */</script> - Restore forwarding:
partytown({ config: { forward: ['dataLayer.push'] } }) - Rebuild and deploy.
- Switch back to:
Tip: If you use a CDN/edge cache, purge after toggling to ensure the correct script type is served.
8) Production hardening & performance notes
- Partytown forwarding: ensure
forward: ['dataLayer.push']is set so GTM can listen off‑thread. - Defer heavy vendors: keep third‑party scripts inside Partytown where possible.
- Stable event names: changing names breaks dashboards. Version with care.
- Guard rails in code: if
window.dataLayeris missing, create it (window.dataLayer ||= []). - Avoid PII: don’t push personal data (e.g., phone, email) to analytics. Keep identifiers high level.
- Error telemetry:
popup_form_errorshould include a coarse message only (no stack traces).
Why this setup works (and keeps your site fast)
- Astro keeps your critical UI static and lean.
- Partytown moves GTM off the main thread, reducing contention with your app code.
- GTM DLVs give marketing clean, structured data without extra dev work.
- Event schema is minimal and stable, so dashboards and audiences remain reliable over time.
Have questions or want a repo template? Ping me - happy to share a minimal starter.
Related articles

Secure your application using CSRF Tokens. Create CSRF Library in PHP
Protect forms and JSON endpoints with session-based, one-time CSRF tokens in PHP. Threat model, design decisions, and a clean class you can drop into any app.
Real-Time WebP Converter in Python for developers
Automatically monitor a folder and convert new images to WebP in real time using Python's Watchdog and cwebp.

Generate Personalized PDF Certificates and Vouchers in Node.js (Full Guide)
Step-by-step tutorial on creating dynamic PDF certificates and vouchers in Node.js using pdf-lib and custom fonts.